It's Friday night, windy as all get out, and we're firing Sunny for the last time. Tomorrow the plan is to tear it apart and pour a concrete countertop on top of the cinder blocks, then put a surface-bonding cement coating over the cinder block foundation. The countertop will be stained with a spray on stain. We've been wanting to try out stained concrete on a project and this will give us a chance to see if we like it. I'm thinking we will. The cinderblocks with the stucco coating will be painted the color of the trim on the house, and with any leftover stain, we will probably put a bit on the actual new clay oven so it will blend with the countertop. It should be really pretty.
Here's a video Greg made tonight.
Friday, April 29, 2011
Wednesday, April 27, 2011
I Return My Flower, A Changed Bee...

Another milestone today. Greg took this picture of a honeybee collecting pollen on a dandelion. Those little orange thingies are sacs on the back legs, which the bee uses to store the pollen she collects on her rounds. When she returns to the hive, other bees will help unload it and stuff it into comb cells for future use in feeding the larvae. This is a good sign and the first indication I have seen that the bees are actively foraging.
Monday, April 25, 2011
Hive Update

I checked on the hives this morning, added syrup to the feeders, and checked on the queens. Both queen cages are empty, meaning the workers chewed through the marshmallows that I had plugged the cage holes with, and released each queen into the hives. Here are a few pictures I took this morning. Things have settled down considerably out there.
There are two hives, both facing south, with one on the east end of the platform and the other on the west end. I'm going to refer to the west hive as hive 1 and the east hive as hive 2. The first picture is of hive 1 with the lid off, before I pulled the empty queen cage out from between the frames.

When I opened the hives, the bees were all over the tops of the frames. When the lid comes off, they instinctively rush to the top of the hive ready to defend it from whatever just took the roof off. Since I needed to get the cages out, I used smoke to drive the bees back down into the frames. here's Li'l Smokey getting fired up and ready to work... I use cedar hamster bedding as the fuel, and newspaper to get it started.
Saturday, April 23, 2011
Whew!!!
They're in! We transferred the two packages of bees into their new hives. Each package contained four pounds of bees and a single queen. Here's how it went...

We loaded the tools, a gallon of syrup, the guidebook, the smoker and fuel for it, and the two packages of bees into the truck. I suited up in my new bee suit and put on the veil and we headed downstairs. Doogan and Sophie both freaked out at the sight of the bee suit until I took the veil off and they realized it was me. The picture to the left is what one package of four pounds of bees looks like.
Once we got out to the vineyard, we opened the gate and I put all of the tools and supplies on the platform between the hives. Greg ran the camera from a safe distance, since he has no bee suit. I then put a package of bees next to each hive and took the cover and feeder off the hives. I've never done this before so I wanted to take my time and not screw up and end up standing there watching my bees fly away.

With the hive tool, I pried one of the cans of syrup out of the first package and slid the little box containing the queen out of the package and covered the hole with a coffee can lid. There were probably a dozen or so bees clinging to the queen cage. I brushed them into the hive, after removing five of the foundation frames. I then wedged the queen cage between a couple of the frames, but not before realizing that there was a cork but no candy in the queen cage, meaning there was nothing to puncture with a nail to allow the bees to chew through to release her over the next couple of days. That means I'm going to have to release her myself in a couple of days once they all get acclimated to their new hives.
Once I wedged the queen cage between a couple of frames, I used a stapler to attach the metal strip attached to the cage to the top of one of the frames so she wouldn't slide down to the bottom of the box. I then picked up the package, banged it on the platform a couple of times, and flipped it upside down, dumping the majority of the bees into the into the hive where the missing frames left a big space. Unfortunately, I failed to remove the coffee can lid that I had temporarily covered the hole in the lid of the package while I finagled around with the queen cage. Once I dumped about 20,000 bees in there, it was going to be way too disruptive to reach in there and retrieve it so it is still in there. I plan to get it tomorrow when I go back to release the queen and replace the missing frames in each hive.
After I put the bees in the hive, I put the feeder on top and then poured about a half gallon of syrup into one side of the feeder so the bees have plenty of food, then put the inner cover and the outer cover on the hive. The only thing I forgot to do was put the pollen patty that I had made to supplement the diet until there's enough real pollen in the area for them to collect. I left it on the platform. I'll put it in there tomorrow when I open the hive to release the queen.
Once the first hive was finished, I had a few minutes to reflect on the mistakes I'd made and on the second hive, I managed to do everything right and things went pretty smoothly. With both packages, I could not get 100% of the bees out when I dumped them out. According to conventional wisdom, putting the open package in front of the entrance to the hive will eventually encourage the stragglers to crawl or fly out of the opening and into the hive, because they can smell the beeswax on the foundation frames, and they can smell the pheromones of the queen, which is still trapped in her cage. We'll go out there in the morning and see if that's true.

All in all, things went pretty much without a hitch. Once the queens are released into the hive population, they should start laying eggs and raising new bees. Within a week I will need to go out there and pull out a couple of frames and examine them to see if the queen has put any eggs in them. If not, I will need to estabilish if she is still alive, and if not, I will need to order a new queen, quickly.
I noted today that there were quite a few dandelions in the grass around the hives so I would expect that if it is warm enough, some of the bees will begin to forage immediately. The sooner they do, the faster the hive population will build up and the more honey they potentially will make.
Honey and Bees and Hives, Oh My!
Finally after months of waiting and preparing and painting and assembling, the bees have a new, permanent (hopefully) home. Here are a few pictures of the process...
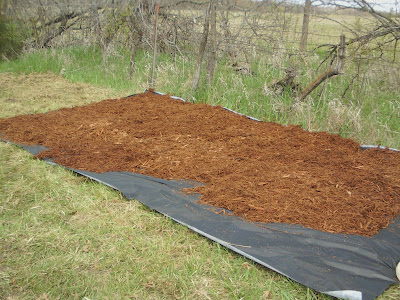 About a week ago we sprayed grass killer in this area where we planned to put the bees. This morning, Greg mowed the area with a brush cutter to get it as flat as possible. We then laid out this landscape fabric and dumped cypress mulch on top of it. This will keep the grass from growing up around the hives, and eliminate the need for running the weed-eater near them, which the bees hate. I also lopped off any branches that were hanging over the hive area. I don't need them falling on the hives and knocking them over. This area is toward the back of the property, near the pond, and up high and facing south.
 Next, we set up a platform out of cinder blocks and pressure treated eight foot 2 x 6 boards I picked up a few days ago at Menard's. Once the platform was reasonably level, we set up the hives on top of the boards, leaving enough room to walk behind them or put hay bales back there as a wind screen in the winter.
Here's what the whole thing looks like finished. Now all I have to do is transfer the bees from their travel boxes to their new homes.
About a week ago we sprayed grass killer in this area where we planned to put the bees. This morning, Greg mowed the area with a brush cutter to get it as flat as possible. We then laid out this landscape fabric and dumped cypress mulch on top of it. This will keep the grass from growing up around the hives, and eliminate the need for running the weed-eater near them, which the bees hate. I also lopped off any branches that were hanging over the hive area. I don't need them falling on the hives and knocking them over. This area is toward the back of the property, near the pond, and up high and facing south.Next, we set up a platform out of cinder blocks and pressure treated eight foot 2 x 6 boards I picked up a few days ago at Menard's. Once the platform was reasonably level, we set up the hives on top of the boards, leaving enough room to walk behind them or put hay bales back there as a wind screen in the winter.Here's what the whole thing looks like finished. Now all I have to do is transfer the bees from their travel boxes to their new homes.
Friday, April 22, 2011
Box O' Bees...

I picked up my two packages of bees today. I drove about an hour north of here to the Bee Man's house to pick them up. I finished up assembling and painting the last few parts of the hives this morning, and they're ready to go to the vineyard tomorrow.
The bees came to Iowa on a trailer from Northern California, and each package includes about 20,000 bees, and a tiny box containing the mated queen. Tomorrow I will install them in their new homes.
I was a little nervous about driving home with them in the Jeep but they did fine. Only two bees got loose in the car, and they joined me in the front seat, and as soon as I cracked open the window, out they went. They were apparently clinging to the outside of the cage when I put them in the back of the Jeep.
The little circle on top of each box (in the picture above) is a can that contains corn syrup or some other sugar mixture, (probably from Cargill, LOL) and it has a hole on the bottom so the bees can feed themselves during the trip from the West Coast. I just checked and the cans are still about half full. I put the boxes in the garage for the night and will install them in the morning once I get everything set up in the vineyard. The weather is really crummy today, light rain and kind of cool. The bees were pretty sluggish. Tomorrow is supposed to be much better, warmer and sunny. I'll put plenty of syrup in the hive feeders so the bees don't get hungry but there are things starting to bloom around here, including dandelions and some kind of wild cherry bushes, as well as some maple trees in the surrounding woods so it should be warm enough for them to start leaving the hive right away and foraging on their own, at least on sunny days.
Tomorrow will be exciting. I will take the boxes up to the vineyard and take a few frames out of the hives. The little box containing each queen will be pried out of the hole with the can, which will be discarded, and the cork in the queen box will be removed. Inside the hole in the little box is a piece of squishy candy which prevents the queen from running out of the box. Over the course of the next three days or so, the bees will chew through this candy and release the queen into the hive, where she will take up residence. Once I put the queen box in between a couple of frames in the hive box, I'll bang the bee box on the ground, flip it over, and dump the bees into the hive through the hole in the top of the box. After that, I'll put the feeder on, with some syrup, and then the lid. According to my bee class instructor, you should leave the hives alone for three to four days, to allow everything to settle down,give the bees a chance to let the queen out of her box, and start building comb on the foundation, which is coated with beeswax to encourage them to get started. Once there is comb, the queen will follow along behind and lay an egg in each cell of the comb. In 21 days, there will be a new generation of bees in the hive. This will go on all summer to the point that there are 60 or 70 thousand bees in each hive.
I will take pictures tomorrow as I set things up out there and get the bees into the hives. I'm sure Greg will be filming too (from inside the truck)...
Saturday, April 9, 2011
Mmmmm

I went to my bee club meeting last night and a lady was selling these eggs from her flock of chickens. These were laid on Thursday and I paid a buck fifty. They look like something Martha Steward would show up to your house with for a housewarming party. They're almost too pretty to eat. Almost!
Subscribe to:
Comments (Atom)
